Verdict: the bench is a structural element, not furniture
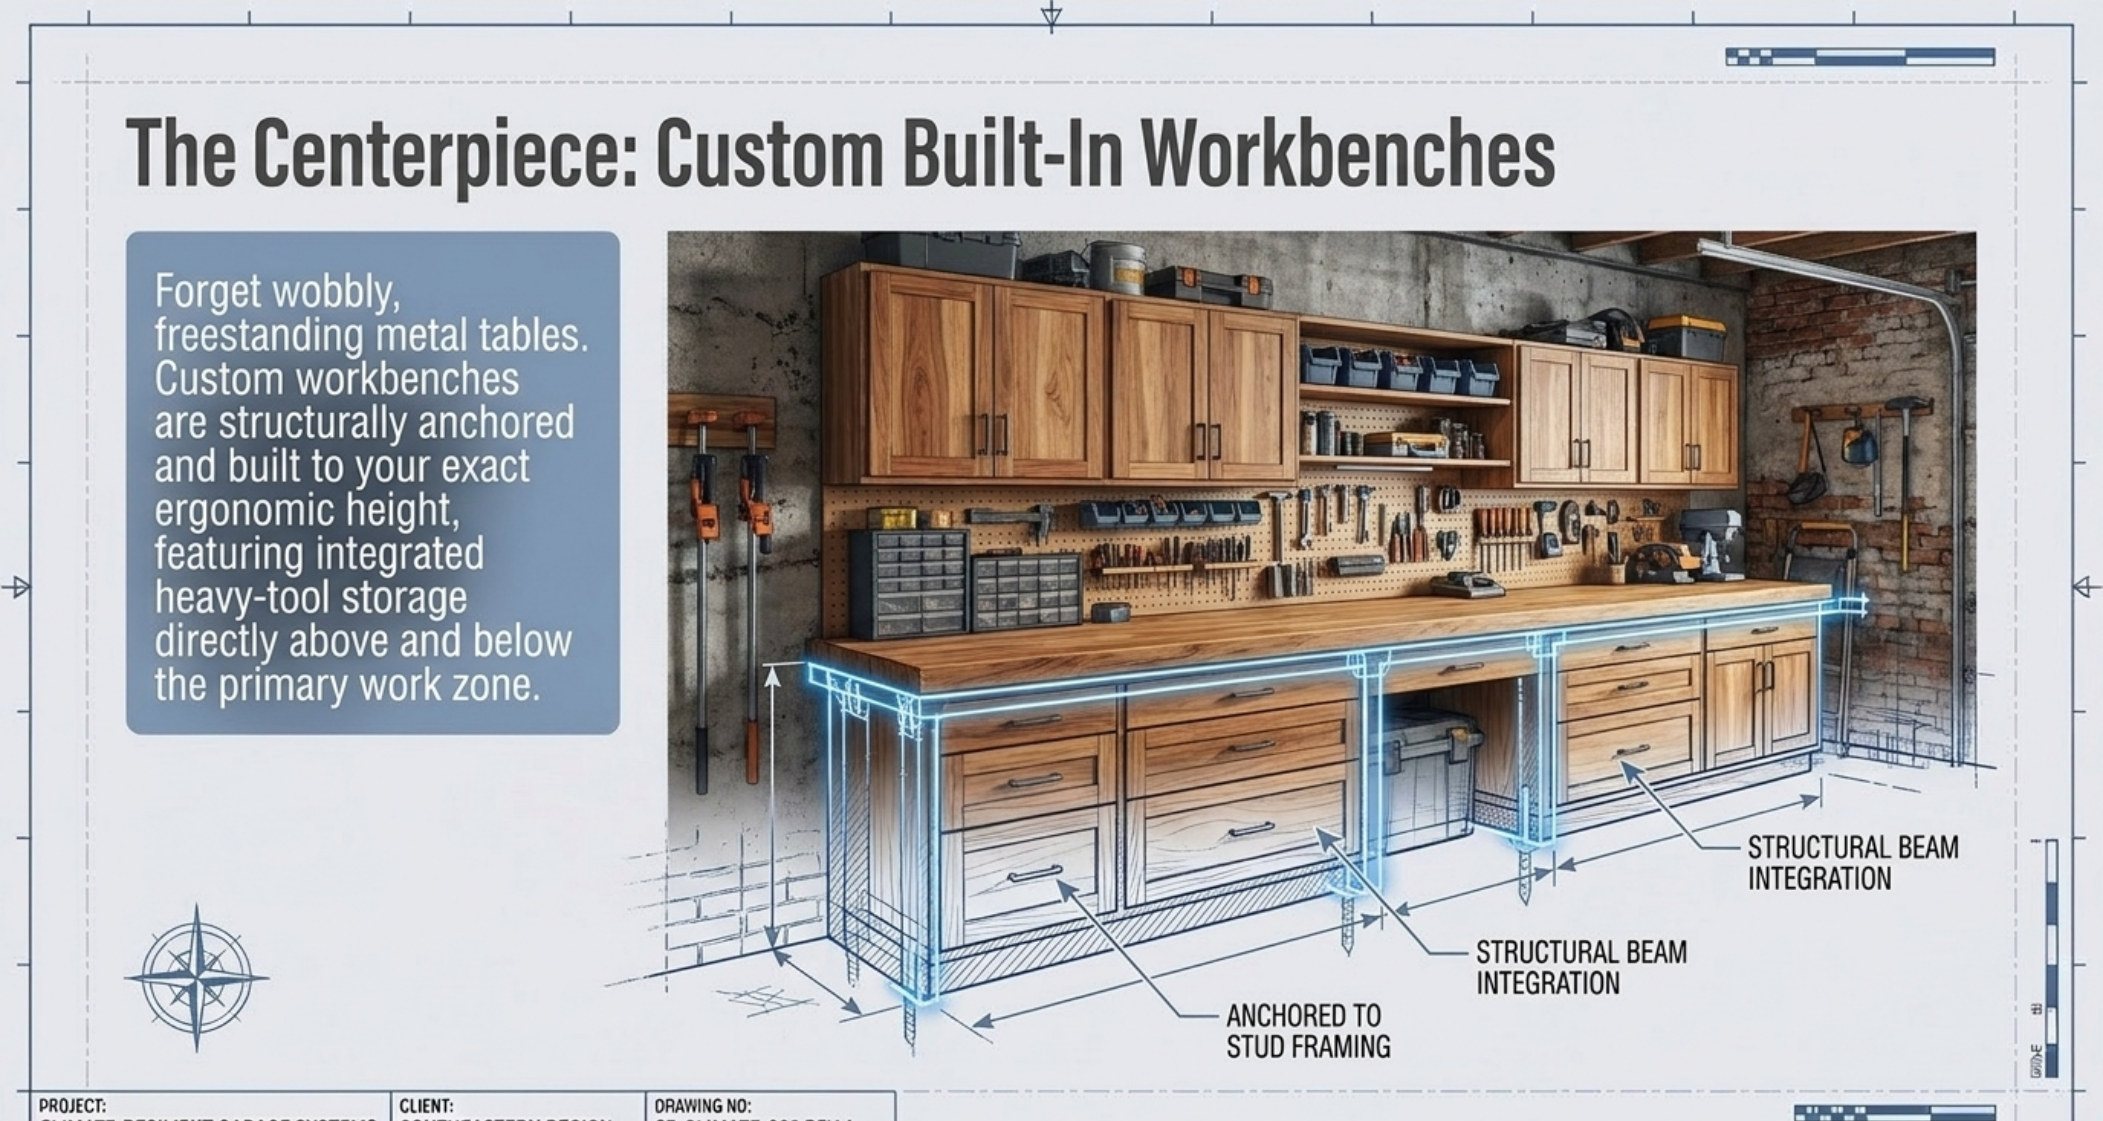
Forget wobbly, freestanding metal tables. A garage workbench takes every force a workshop produces — lateral push, hammering shock, a vice being leaned on, a heavy part dropped on the surface — and a freestanding unit resolves all of it into a frame that is not attached to anything. A built-in bench solves the problem at the source: structural beams integrated into the cabinet run, anchored to stud framing, with storage above and below the primary work zone. The difference shows up the first time you use a hand plane or a vice.
| Bench type | How it resists lateral load | Load it can carry | Where it belongs |
|---|---|---|---|
| Freestanding metal table | Body weight and friction — nothing else | Light; sags under a vice over time | Temporary or rental setups |
| Bolted-down metal bench | Floor anchors with a light frame | Moderate; anchoring helps but the frame still flexes | Rental or slab-limited setups |
| Built-in plywood bench on structural beams | Beams integrated into the cabinet run and anchored to studs | Heavy; the bench loads through the cabinet run into the wall | A permanent working garage |
| Built-in bench with integrated base cabinets | Distributes load through a plywood base run | Heavy, plus tool weight inside the base | Anything with stored tools below the bench |
The deck baseline is explicit on this: the bench is anchored to stud framing and carries integrated heavy-tool storage above and below the work zone.
Height is a specification, not a preference
A bench is only usable if it matches the work. Set too high, you work with your elbows out and lose control on detail joints; set too low and you bend for hours. The comfortable ranges differ by task, which is why serious garages end up with two surfaces rather than one compromise. Because custom benches are fabricated rather than bought, the height can be matched to the primary work and the primary worker instead of to a stock frame.
| Primary work | Typical surface height | Why | Storage implication |
|---|---|---|---|
| General standing work with hand tools | Around 36″ | Elbow-height control without stooping | Standard drawer bank underneath |
| Assembly and heavy disassembly | Around 30–32″ | You work over the top of the piece | Clear floor for a rolling cart rather than drawers |
| Detail and precision bench work | Around 38–40″ | Close visual range, forearms supported | Shallow drawers plus overhead lighting |
| Vice-heavy metal work | Around 34–36″ | Force applied downward and horizontally | Reinforced bench top, beams behind the front edge |
Heights are typical trade ranges — measure to your own standing elbow and subtract for the task rather than copying a catalogue number.
Cost model: pricing a bench run by the linear foot
A built-in bench is bought by the linear foot, like the cabinets in its run. A 10-foot bench with base storage below and a locker at one end prices at roughly $1,500–$4,000 as stock or RTA, $3,500–$6,500 as semi-custom and $5,000–$12,000 as full custom with an all-plywood carcass. The $400 mass-market bench is cheaper on the invoice, but the same 10 feet still needs uppers, drawer storage and a work surface — the honest comparison is the run plus the second purchase the kit forces.
Depth moves the figure more than material choice: a 24-inch bench clears a car door, while stepping a section up to 36 inches adds roughly half again to the top and carcass, so the same 10 feet in the custom band moves from about $5,000 toward $7,500.
The import line sits on top. Hardware and imported knock-down components fall under the 2026 Section 232 tariff line of 25% on imported wood products, so a run with a third of its material imported adds about $500 of duty on a $6,000 package and about $1,000 on a $12,000 package. Ask the shop to name the manufacturing origin on the quote, before deposit rather than after delivery.
Storage above and below the work zone
The reason a built-in bench outperforms a table is that it can absorb the storage the table wastes. The bench run becomes the anchor for upper units above head height, shallow shelves for frequently used tools at arm's reach, and base drawers for the heavy items that should stay low. Designing all three at once is what makes the bench a workstation instead of a surface.
| Zone | Typical use | Specification that matters |
|---|---|---|
| Above head height | Infrequently used tools, seasonal gear | Anchored into studs; light items only |
| Arm's reach above the bench | Daily hand tools, consumables | Shallow shelves on reinforced standards, sealed edges |
| Base drawers below the bench | Heavy tools, power tools, fasteners | Dovetail drawer boxes on full-extension under-mount glides |
| Bench surface | Assembly, impact, cutting | Solid hardwood or double-layer plywood top; sacrificial, replaceable |
The load in a garage bench is a point load, not a distributed one — which is why the deck standard for shelves (15 lb/sq ft, 1/4″ maximum deflection) is a floor, not a target.
What the anchoring actually involves
Three decisions make the difference between a bench that feels solid and one that creeps. First, the anchor: the units must be fixed into stud framing, with a solid-wood hanging rail or ledger transferring the load into the wall structure rather than into drywall. Second, the beam: a structural member integrated into the run carries the bench top and prevents the front edge from flexing when you lean on it or load it. Third, the base: a plywood carcass distributes the load across the floor instead of concentrating it at four feet, which is why built-in benches stay level over years while tables settle. None of the three is expensive on their own. Leaving any one out is what produces the wobble people notice in year two.
The remaining trade-off is permanence. A built-in bench should be treated as part of the house, which means it should be designed for the garage you have and the work you do in it — not for a future move. If the garage layout is still in flux, build the bench last.
Where the bench goes decides how often you use it
Anchoring solves rigidity; placement solves usability. A bench belongs against a solid wall between two cabinet runs, not floating in the middle of the floor, because the run on either side can carry the beams and the storage the bench depends on. Keep the primary work zone away from the garage door opening, where wind, rain and temperature swings land on the surface and where dust from the driveway settles. If the garage is used for parking, measure the vehicle envelope first and design the bench depth around it — a 24-inch-deep bench against a wall that clears a car door is worth more than a 36-inch bench that forces the car outside.
Lighting is the other placement decision. Overhead fluorescent or LED strips hung directly above the bench top remove the shadow your own body casts on the work, and the cost is trivial next to the cabinet run. It is the single cheapest improvement to bench usability, and it belongs in the plan rather than being solved with a portable lamp afterwards.
Decision matrix: choose the bench that fits the work
- Choose an anchored built-in bench if you use a vice, a hand plane or a bench grinder — point loads, which a freestanding frame converts into movement.
- Choose a 24-inch depth if a vehicle parks in the garage and the car door has to open against that wall; go deeper only where the bench is the work surface first.
- Choose two surfaces rather than one compromise if the work splits between assembly and precision — a bench that suits both suits neither.
Maintenance truth table: what to check and when
| Watch item | What it looks like when it starts | Check interval | Corrective action |
|---|---|---|---|
| Hanging rail and bench anchors | The run creeps sideways under lateral push | Before each humid season | Re-fix into stud framing; drywall anchors are not a repair |
| Bench-top front edge | Visibly flexes when you lean on it or load it | Whenever the gear on the bench changes | Add the structural beam that carries the top |
| Shelf deflection | Sag beyond 1/16 in per lineal foot, 1/4 in absolute maximum | After the heaviest load is stored | Re-brace or redistribute, then re-check under load |
| Hinges and glides | Soft-close stops holding; drawer corners begin to rack | Every 5 years of daily use | Adjust, then replace with load-rated hardware |
| Base at the slab | A damp line at the foot of the run | Annually, after the wet season | Lift onto legs or a sealed toe kick; nothing composite within an inch of the floor |
Intervals are planning assumptions; the 1/16 in per lineal foot (1/4 in absolute maximum) deflection threshold is the deck's own residential standard.
Spec handoff: the seven lines for a bench project
- Bench height set from the primary work and the primary worker, recorded on the drawing.
- Anchors into stud framing, with a solid-wood hanging rail or ledger carrying the load.
- A structural beam integrated into the run beneath the bench top.
- 3/4 in plywood carcass, no particleboard, every cut edge sealed.
- Heavy-duty soft-close hinges and load-rated full-extension glides.
Planning a working garage in Birmingham? Call (205) 574-3205 and we will match you with local cabinet professionals who build anchored workbench and storage systems across Birmingham, Hoover and Jefferson County. Free, and no obligation.
Ready to Talk to a Local Cabinet Pro?
Get free, no-obligation quotes from pre-vetted Birmingham cabinet professionals — licensing, insurance and references checked before you are introduced.
Get Matched in Birmingham →